
The launch of Artemis II is coming soon at Kennedy Space Center, and it is going to be unlike anything most people have seen in their lifetimes. The last time a crewed moon rocket launched from this pad at Kennedy was Apollo 17 in December 1972, and the Space Launch System is even more powerful than the Saturn V that carried those astronauts to the Moon. The plumes will be blinding, the sound will rattle your chest and your car windows, and the moment will be etched in your memory forever. If you are a photographer, you have a once-in-a-generation opportunity to document history.


NASA/Bill Ingalls
This guide is written for hobbyist photographers — people who own a DSLR or mirrorless camera and want to come home with something more than a blurry phone photo. We will walk through where to stand, what gear to bring, how to dial in your settings, and what makes the SLS so dramatically different to photograph compared to a Falcon 9.
Fair warning: this article is long. There is a lot to cover. But Artemis II is a once-in-a-lifetime shot — in more ways than one — and you deserve to be ready for it.
Why Artemis II Is a Photographer’s Dream (and Challenge)

Space Launch System generates roughly 8.8 million pounds of thrust at liftoff. For context, Falcon 9 produces about 1.7 million. That difference is not just felt — it is seen. SLS runs on a combination of four RS-25 engines burning liquid hydrogen and liquid oxygen, plus two five-segment solid rocket boosters. The result is a visually spectacular and complex exhaust plume that is entirely unlike what you see behind a Falcon 9. In many ways, SLS is more like an Atlas V or Vulcan than Falcon 9, Falcon Heavy or even New Glenn. That’s because Atlas V and Vulcan both utilize solid rocket boosters, as does SLS. Those solid rocket boosters burn a combination of aluminum and perchlorate, and are very bright.
The RS-25 engines produce a nearly transparent, diamond-laced flame — the liquid hydrogen burns almost colorless at high efficiency. The solid rocket boosters, by contrast, produce enormous billowing clouds of white smoke and brilliant orange-white flame. The combination of these two very different exhaust signatures creates a visual spectacle that makes for compelling and difficult photography at the same time. There is nothing else in the current launch catalog quite like it.
The bottom line for photographers: the SLS plume will be significantly brighter and much more voluminous than you are used to seeing on social media. Plan accordingly, or you will come home with a very bright white blob.
Location, Location, Location
LC-39B is located on the northern end of Kennedy Space Center, essentially on the same latitude as Playalinda Beach and Biolab Road on the opposite (eastern/Atlantic) side of the peninsula. Your viewing angle, distance, and the foreground you can compose all vary dramatically depending on where you plant your tripod. Let’s look at the top options.
See also: Viewing Spots For Artemis II
1. Kennedy Space Center Visitor Complex — Banana Creek Viewing Site
If you want the closest public view and the most iconic launch experience, the Apollo/Saturn V Center’s Banana Creek Viewing Site is hard to beat. It is approximately 3.5 miles from LC-39B and offers a clean, wide-open sightline to the pad. You will be looking at the launch tower from slightly south, and the pad will be prominently visible above the flat Florida scrubland.

Getting here requires KSCVC admission and a separate launch viewing ticket. General admission for adults runs approximately $75 online, children $65, and parking runs $15 per vehicle. Launch viewing tickets for a high-profile mission like Artemis II can run significantly higher — during Artemis I, premium viewing packages were $250 per person. Check the KSCVC website for current pricing as launch day approaches. Tickets were sold out in January, but more could be released and it’s worth checking for availability.
One important note: Read the ticket fine print very carefully. Launch viewing tickets are typically valid for a single attempt. If the mission scrubs, your ticket may be considered used — a lesson many Artemis I attendees learned the hard way. Know the policy before you purchase.
More info: Kennedy Space Center Visitor Complex: See A Launch
From Banana Creek, your best focal length for filling the frame at pad level is in the 300–600mm range. A 70–200mm lens will work, but the rocket will be relatively small. If you have a 100–400mm zoom or a 150–600mm, bring it. You can also shoot wider to include the crowd, the Florida sky, and the steam cloud rising as SLS climbs — those wide shots tell the story of the event as much as a tight rocket frame does.
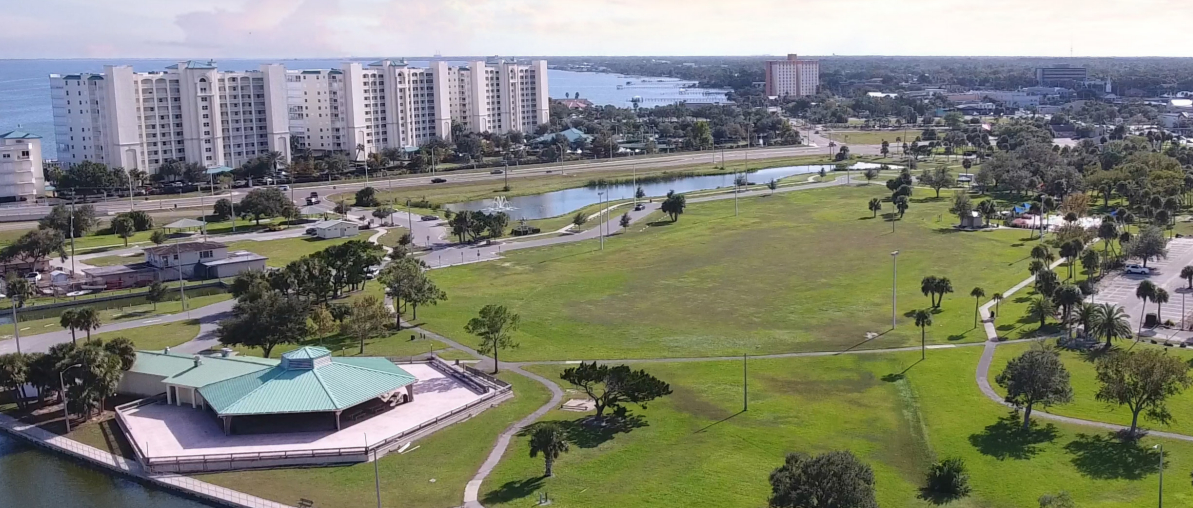
2. Space View Park and the Titusville Waterfront
For photographers who want maximum crowd and event atmosphere — and a unique perspective of SLS tracking northeast over the Indian River — the Titusville waterfront is a tremendous option. Space View Park sits directly across the Indian River from LC-39B, approximately 12 miles away. That distance sounds large, but SLS and the SRB plume are enormous. You will absolutely be able to photograph the launch from here, particularly as the vehicle climbs to altitude.
The tradeoff is focal length: you will need 400mm or more to get a reasonable frame fill at pad level, and 600mm or beyond for tight shots. If you have a super-telephoto, this is where it shines. The water-and-rocket compositions available from this location are very popular with local photographers and almost guarantee a clean background with no obstructions.
The Titusville waterfront is free, easy to access, and a family-friendly option. Parking fills quickly for high-profile launches, so arrive early. Bring a chair, because you will be waiting a while.
3. SR-528 / Bennett Causeway Viewing Area
The State Road 528 causeway over the Banana River is a well-established and popular free viewing spot for launches. The views across the open water are clean and unobstructed, and the causeway puts you roughly 10-12 miles from the pad on a relatively direct line of sight.
Photographers here benefit from the wide, flat water foreground — the Banana River reflects the plume beautifully in the right lighting conditions, especially for a late-afternoon or evening launch window. A 300–500mm lens is a good match for this distance. Bring a tripod, as the causeway surface can transmit vibration from traffic and crowd movement.
Arrive early. The causeway fills from both ends for a high-profile launch, and the viewing pullouts have limited capacity. Check local news in the days before the launch for any road closure or access advisories specific to Artemis II.
4. Jetty Park, Port Canaveral
Jetty Park is a Brevard County park at the north side of the Port Canaveral inlet, and it offers a superb combination of beach, open sky, and a direct waterfront view toward the launch pads. The park sits roughly 12–13 miles from LC-39B, and the open Atlantic beach and jetty give you tremendous compositional options — you can frame SLS rising over the water with the jetty rocks in the foreground, or pull back and include the lighthouse and the port entrance channel.
Jetty Park charges a vehicle entrance fee (typically $15, subject to change), and the park has restrooms, food concessions, and ample parking — a significant quality-of-life advantage over less-developed sites. For a long launch day wait, it is one of the more comfortable free-standing viewing spots on the southern end of the Cape. The park fills quickly for major launches, so plan on arriving several hours early.
More info: Jetty Park — Port Canaveral
5. Cocoa Beach and Cape Canaveral City and County Parks
The beaches and waterfront parks along the southern end of Cocoa Beach and the City of Cape Canaveral are solid, free options for photographers who want an Atlantic Ocean foreground. Several parks along this stretch offer open sightlines north toward LC-39B:
Beach Viewing Parks — Cocoa Beach & Cape Canaveral
| Park | Location | Notes |
|---|---|---|
| Lori Wilson Park | Cocoa Beach | Well-maintained Brevard County park with beach access, parking, and restrooms. Wide, open beach gives a clean foreground and unobstructed sky. |
| Sidney Fischer Park | Cocoa Beach | Brevard County beach park with decent parking capacity. Similar viewing angle to Lori Wilson — a solid alternative if the northern lot fills. |
| Cherie Down Park | Cape Canaveral | City of Cape Canaveral beach park with direct Atlantic access. Slightly farther north than the Cocoa Beach parks — marginally closer to the pad. |
Note: All three parks offer free beach access. Parking availability and hours vary — arrive well before launch time to secure a spot.
From these locations you are approximately 13–16 miles from LC-39B. You will not be filling the frame with the launch tower at those distances, but SLS is a large vehicle and the plume will be dramatic and easily photographable. The beach crowds, the Atlantic horizon, and the sheer scale of the moment make for compelling wide and medium compositions. A 200–400mm lens is a good range here. You will also be able to track SLS for an extended period after liftoff as it climbs northeast over the Atlantic.
Parking at all these locations fills quickly for a high-profile launch. Early arrival — three to four hours minimum — is strongly advised.
6. On the Water: Star Fleet Tours
For a genuinely unique perspective, Star Fleet Tours operates launch viewing boat trips from Port Canaveral. For Artemis II, they are planning to position their vessel outside the launch hazard area in the Atlantic, roughly 10 miles from the pad — giving passengers a clear view across open water along the rocket’s easterly trajectory. It is a vantage point simply not available from land.
From a photography standpoint, the boat offers a clean, low-horizon view of SLS with no trees, buildings, or crowd heads blocking the frame. The downside is platform stability — a boat moves, even at anchor, and that makes long telephoto shots more challenging. Plan to use a faster shutter speed than you would on land (1/2000 sec or faster), and consider a monopod rather than a tripod for adaptability to the moving deck. Image stabilization is your friend here; keep it active.
Current pricing as of this writing:
Star Fleet Tours — Pricing & Departure Info
| Trip | Price (per passenger) | Departure |
|---|---|---|
| Launch Viewing Trip Main Deck |
Port Canaveral | |
| Launch Viewing Trip Upper Deck |
Port Canaveral | |
| Sunset Pad Cruise | Port Canaveral |
Ticketed event — advance booking required.
Note: Prices and availability are subject to change. Confirm departure times, boarding requirements, and ticket availability directly with Star Fleet Tours before launch day.
Star Fleet is also offering Artemis Launch Pad Sunset Cruises in the days leading up to launch — a 3-hour trip departing from Sunrise Marina in Cape Canaveral that gets you within roughly 2 miles of LC-39B across the water. For photographers, this is an extraordinary opportunity to shoot SLS on the pad from an angle and distance that is simply not achievable from any public land location.

Scrub policy: tickets are generally non-refundable, but if a delay is announced before check-in time, your ticket remains valid for the next attempt within the same launch period. Review the full policy on their website before purchasing.
More info and tickets: Star Fleet Tours — Artemis II Launch Viewing
Best Public Viewing Spots for Artemis II
| Area | Spot | Distance | Notes |
|---|---|---|---|
| KSC (Ticketed) | Banana Creek / Apollo-Saturn V Center | ~3.9 mi | Premier viewing for LC-39 launches. Ticketed via KSCVC. Info |
| Titusville | Max Brewer Bridge & Parrish Park | ~11.1 mi | Elevated bridge vantage. Excellent for LC-39 launches. Fills very quickly. |
| Titusville | Space View Park | ~11.6 mi | Iconic riverfront viewing. Live audio feeds. Very popular—arrive early. |
| Titusville | Rotary Riverfront Park | ~11.8 mi | Open river views; good parking. Less crowded alternative. |
| Titusville | Kennedy Point Park | ~12.0 mi | Long riverfront; good tripod space. Near marina. |
| Titusville | Space Bar (Rooftop) | ~11.5 mi | Rooftop view with food/drinks. Check hours. |
| Port Canaveral | SR-528 Bennett Causeway pull-offs | ~14.5 mi | Open causeway views. Farther but still viable. |
| Port Canaveral | Jetty Park | ~14.6 mi | Beach and pier access. Good for families. Fees |
| Cape Canaveral | Cherie Down Park | ~15.2 mi | Beach access. Dunes may block first seconds. |
| Cocoa Beach | Alan Shepard Park | ~17.4 mi | Beachfront. Named for America’s first astronaut. |
| Cocoa Beach | Cocoa Beach Pier | ~16.8 mi | Horizon view over ocean. Tourist crowds. |
Potential obstruction Fee, paid parking, or ticket required
Note: Distances are approximate straight-line measures to LC-39B. Access, hours, fees, and closures may change—verify before launch day.
Gear: What You Actually Need
You do not need professional gear to get a good launch photograph. You do need the right gear for the situation. Here is a practical rundown.
Camera Body
Any modern DSLR or mirrorless body will work. An entry-level Canon Rebel, Nikon D3500, or Sony a6000-series will do the job. Higher-end bodies give you faster burst rates and better autofocus, which does help during the fast-paced launch sequence, but the fundamentals matter far more than the price of your camera body.
If your camera can shoot at 5+ frames per second in burst mode, use it. You want to be firing continuously during the 10-15 seconds after liftoff while the SLS is still near the pad.
Try not to give in to the temptation to zoom in tightly on the rocket; leave about 10-15% negative surrounding space at a minimum. You can always crop in post-production if you like. Not zooming in too closely helps ensure you will get your shot. This is a 322-foot-tall machine with a plume tail at least 1.5 times as long.
Lenses
Your lens selection should match your location:
Focal Length Guide by Viewing Location
| Location | Focal Range | Notes |
|---|---|---|
| Banana Creek (KSCVC) |
100–400mm 150–600mm |
A 100–400mm or 150–600mm zoom is ideal. A 70–200mm f/2.8 will work but the rocket will be on the small side. A 300mm f/4 prime is a solid middle ground. |
| SR-528 Causeway / Jetty Park / Titusville Waterfront |
300–500mm | 300–500mm is a good working range. You can go wider for environmental shots that include the water and crowd. |
| Cocoa Beach & Cape Canaveral Beaches |
200–400mm 70–200mm |
200–400mm for tighter shots; a 70–200mm works well for wide, atmospheric compositions with the Atlantic in the foreground. |
| Star Fleet Tours Boat | 200–400mm | Long telephoto is harder to stabilize on a moving vessel — lean toward the shorter end of your zoom range and use a fast shutter speed. |
| Wide Angle: 2nd Body / 2nd Shooter |
24–70mm 16–35mm |
Set one camera up wide to capture the sweep of the plume and crowd reaction. These shots tell the story of the event and are often more compelling than tight telephoto shots. |
Stabilization challenge on moving platforms
Note: Focal ranges are general guidelines. Sensor crop factor (APS-C vs. full frame) will affect your effective reach — APS-C shooters can use shorter lenses to achieve equivalent framing.
Tripod or Monopod
A tripod is strongly recommended, especially for longer focal lengths. A 500mm lens hand-held at T-0 is a recipe for blurry photos, even with vibration reduction active. A solid tripod with a fluid head or a ball head that pans smoothly will help you track the rocket during ascent.
A monopod is a good compromise if space is tight in a crowd, or if you are shooting from a beach where setting up a full tripod is awkward.
One important setting note if you are using a tripod: turn off optical stabilization / vibration reduction on your lens. Leaving it active on a stationary tripod can actually cause blur as the system hunts for movement that is not there.
Remote Shutter Release
A wired or wireless remote shutter release eliminates camera shake at the moment of exposure if you are using a tripod. For burst shooting at long focal lengths, it is worth having. If you don’t have one, use your camera’s self-timer or, better yet, set your camera to burst mode and use the physical shutter with a firm grip and a braced position.
Memory Cards and Batteries
Bring more memory than you think you need. RAW files from a modern mirrorless or DSLR body can run 25–50 MB each, and burst shooting during the launch sequence will eat through cards quickly. Two 128GB cards gives you plenty of headroom. Make sure your cards are rated fast enough for burst shooting — look for V30 or V60 speed class ratings.
Bring a fully charged spare battery, full stop. Florida heat and direct sun will drain a battery faster than a climate-controlled studio, and if your battery dies during the final countdown sequence, you will be unhappy.
Gaffer’s Tape
This one surprises people who haven’t read it before. Once you have focused your lens on the launch pad, secure the focus ring with a small strip of gaffer’s tape — the non-residue kind, not duct tape. It is very easy to accidentally bump your focus ring during the excitement of the launch, which will leave you with perfectly sharp clouds and a blurry rocket. Tape it down and don’t think about it again.
Camera Settings: The Fundamentals
Photography is part science, part art, and rocket launches are among the most technically demanding subjects you will ever encounter. The core challenge is dynamic range: the SLS plume at liftoff can exceed several thousand degrees Celsius, and the flame will be extraordinarily bright against a morning or afternoon sky. Your camera’s meter, if left to its own devices, will almost certainly overexpose the exhaust and render it as a featureless white blob.
Here is how to prevent that.
Shoot in RAW + JPEG
Always shoot RAW for a launch, even if you normally shoot JPEG. RAW files capture the full bit-depth from your sensor — 12 or 14 bits depending on your camera — giving you thousands more tonal levels to work with in post-processing. That means recoverable highlight detail in the SRB flame, recoverable shadow detail in the vehicle body, and maximum flexibility to fix any exposure errors later.
JPEG is fine for everyday shooting. For Artemis II, it is not enough. The dynamic range of this scene — a column of fire against a Florida sky with a dark steel rocket body — demands every bit of data your sensor can capture. Shoot RAW, and you will thank yourself later.
Set your camera to RAW + JPEG if available. The JPEG gives you a quick preview for sharing; the RAW is what you edit for your best shots.
Underexpose
This is the single most important camera setting tip for SLS photography. The plume from four RS-25 engines plus two solid rocket boosters will be intensely bright. If you meter for the sky or the launch pad structure, the exhaust will blow out completely — no texture, no shock diamonds, no color, just white.
Set your exposure compensation to at least –1 EV or –2 EV. Consider going to –2 or even –3 EV for the initial liftoff shots, when the solid-rocket glare is at its brightest. SLS is brighter at the pad than Falcon 9 — significantly so — and the SRBs in particular will test your exposure. Underexpose aggressively, and you can always lift the shadows in Lightroom. Blown-out highlights are gone forever.
And Bracket Your Shots
Artemis II will happen once. This is not a Starlink mission where another one goes up next week. Insurance your odds of getting a properly exposed shot by using your camera’s Auto Exposure Bracketing (AEB) function to fire a sequence of three or five frames at different exposures — for example, –2 EV, –1 EV, and 0 EV simultaneously. Later, you will choose the frame that best balances the rocket body, the plume, and the sky.
Check your camera manual for how to enable AEB with burst mode. On most Canon bodies, it is in the Shooting menu; on Nikon bodies, it is typically mapped to the BKT button. If you are unsure, ask your camera’s model name plus “auto exposure bracketing burst mode” and you will find a clear tutorial.
Shutter Speed: Go Fast
A fast shutter speed freezes the rocket and the exhaust plume, preserving the detail of the SRB flame and the shock diamonds in the RS-25 exhaust. Use a minimum of 1/1000 sec, and 1/2000 sec or faster is better.
As a practical guideline, use a shutter speed of at least twice your focal length as a floor. Shooting at 400mm? Minimum 1/800 sec. Shooting at 600mm? Minimum 1/1200 sec. In practice, for a bright Florida morning launch, you should be able to achieve 1/2000 sec or faster without difficulty.
If you need to sacrifice something to get to a faster shutter speed, sacrifice aperture before ISO. A slightly higher ISO — say, 400 or 800 — in RAW is very manageable in post-processing. Camera shake and plume blur are not.
Aperture and ISO Baseline
A mid-range aperture of f/8 to f/11 is a solid starting point for launches. This gives you sufficient depth of field so that minor focus variations don’t matter, and it places you in the optical sweet spot of most lenses where sharpness is maximized.
On a sunny Florida day — partly cloudy, sun high in the sky — the exposures start at:
Camera Settings — At a Glance
| Setting | Value |
|---|---|
| Mode | Shutter Priority (Tv/S) or Manual |
| Shutter Speed | 1/2000 sec |
| Aperture | f/8 |
| ISO | 200–400 |
| Exposure Value (EV) | 16 |
| Exposure Compensation | –1 to –2 EV |
Note: These are recommended starting points. Adjust based on actual lighting conditions at your viewing location.
Artemis II won’t launch mid-day, but those numbers are good to know as a starting point. More specific numbers are below.
Take test shots well before T-0 and evaluate your histogram. Adjust as needed. Then set it and don’t touch it again until after liftoff.
A Quick Word On Exposure Value
Exposure Value (EV) is a single number that combines shutter speed, aperture, and ISO into one unified measure of light. That simplicity is its greatest strength when you’re working in unpredictable or extreme conditions. Rather than mentally juggling three interdependent variables, a photographer who knows their target EV can make fast, confident adjustments in any direction. Bump the ISO, tighten the aperture, or shorten the shutter speed — as long as the combination lands on the right EV, the exposure stays correct. For launch photography, where the scene shifts from dark pre-dawn stillness to a blinding plume in under two seconds, having that anchor number lets you pre-set your camera with precision rather than guessing and hoping auto modes keep up.
The real power of EV becomes apparent in situations where the light is deceptive — high-contrast scenes, transitional lighting at dawn or dusk, or the extreme luminance range of a night launch where a dark sky and a hydrogen-oxygen 50-story flame plume exist in the same frame. In these cases, camera metering systems are easily fooled, often exposing for the wrong part of the scene. Knowing that your target EV for a night launch is, say, 15 — and understanding exactly what shutter, aperture, and ISO combinations achieve that — puts the photographer in control rather than at the mercy of the camera’s algorithm. It also makes bracketing more systematic: instead of randomly dialing in compensation, you’re deliberately stepping one EV up or down from a known baseline, which produces a more usable bracket spread and better odds of a technically clean frame when it counts.
How do you calculate Exposure Value? There are tools for that in the App Store (Apple) and in the Google store for Android.
Exposure Value Calculator
Defaults set for an Artemis II daytime launch. Use the arrow buttons or scroll wheel on each card. Lock EV to see how changing one setting affects the others to maintain exposure.
Loading…
Focus: Manual and Taped
Do not use autofocus during the launch sequence. When SLS clears the tower and the plume fills the sky, your autofocus system may hunt, lock onto the wrong part of the scene, or simply get confused by the extreme contrast and dynamic range. That is the last thing you want happening when history is lifting off.
Before the launch, focus on the launch tower or the pad area using autofocus or live view magnification. Confirm you are sharp. Then switch your lens to manual focus and apply a small strip of gaffer’s tape to the focus ring. Done. Now you will not accidentally bump it during the excitement.
You are shooting at or near optical infinity regardless of where you are located. The fine-tuning matters less than you think at these distances, but locking focus down is still best practice.
Drive Mode and Metering
Set your drive mode to continuous high burst. You want to be firing as fast as your camera allows from the moment the rocket starts to rise until the vehicle is well above the pad. Your camera’s buffer will eventually slow you down — that’s okay. Fire continuously through the first 15 seconds, then let the buffer clear and continue tracking as SLS climbs.
Set metering to evaluative/matrix metering as a starting point, then apply your exposure compensation on top of it. Some photographers prefer spot metering on the sky or the rocket body, but evaluative metering with deliberate underexposure is a simpler and more forgiving workflow for launch day.
What Makes the SLS Different: The Plume

If you are accustomed to photographing Falcon 9, or if you have only seen those launches as a reference for what to expect, prepare for a significant adjustment. SLS is a completely different photographic subject.
The RS-25 engines ignite first, approximately 6.7 seconds before T-0. You can see the ignition on the livestream and sometimes hear it in person — a brief rumble and a pale, nearly transparent flame from the base of the core stage. At T-0, the two solid rocket boosters ignite and the hold-down posts release. The vehicle lifts off, and the visual scale changes instantly. The SRBs produce enormous, brilliant orange-white flame columns and thick white smoke that billows outward from the flame trench. The combination of the near-transparent RS-25 plume threading through the SRB smoke creates complex, layered exhaust structures that are extraordinarily photogenic.
The SRBs burn for approximately two minutes before separation. Capturing SRB separation is a challenging but rewarding shot — the twin boosters will be far above the pad and small in frame, but if conditions and focus are right, it is a remarkable image. Use your highest shutter speed and maintain your manual focus lock for those shots.
One additional note: the sound will arrive anywhere from 15–60 seconds after visual liftoff, depending on your location. (Sound travels a mile in five seconds at sea level.) Be ready for it. The pressure wave from SLS is not subtle — it is physical. If you are at Banana Creek, you will feel the engines in your chest, and the crowd reaction in that moment is itself a photograph worth capturing.
For a Late Afternoon / Dusk Launch
Quick Reference: Camera Settings Cheat Sheet (Dawn/Dusk)
| Setting | Recommended Value | Notes |
|---|---|---|
| Mode | Shutter Priority (Tv/S) or Manual |
Manual gives full control; Tv is forgiving for beginners. |
| Shutter Speed | 1/1000 – 1/2000 sec (or faster) |
Freezes plume and rocket motion. |
| Aperture | f/8 – f/11 | Sweet spot for sharpness; sufficient depth of field. |
| ISO | 200 – 400 (Auto ISO acceptable) |
RAW handles noise well up to ISO 1600+. |
| Exposure Value (EV) | 15 | Target starting point for dawn/dusk conditions. Use the exposure calculator to dial in your settings before launch day. |
| Exposure Compensation | –1 to –3 EV | SLS plume is extremely bright; err darker. |
| White Balance | Auto or Daylight | RAW lets you adjust freely in post. |
| Focus Mode | Manual (pre-focused & taped) |
Lock focus before liftoff; AF can hunt. |
| Drive Mode | Continuous High Burst | Fire from T-0 through the first 15–20 sec. |
| Metering | Evaluative / Matrix | With deliberate underexposure applied on top. |
| File Format | RAW + JPEG | RAW for editing; JPEG for quick sharing. |
| Stabilization | OFF on tripod; ON if hand-held |
VR/IS on a tripod can introduce blur. |
Pay special attention to this setting on launch day
Note: These are starting points — conditions vary by time of day, weather, and distance from the pad. Shoot a test frame as soon as the rocket clears the tower and adjust if needed.
I strongly recommend either using manual or aperture mode with bracketing to -1, -2 or -3 stops.
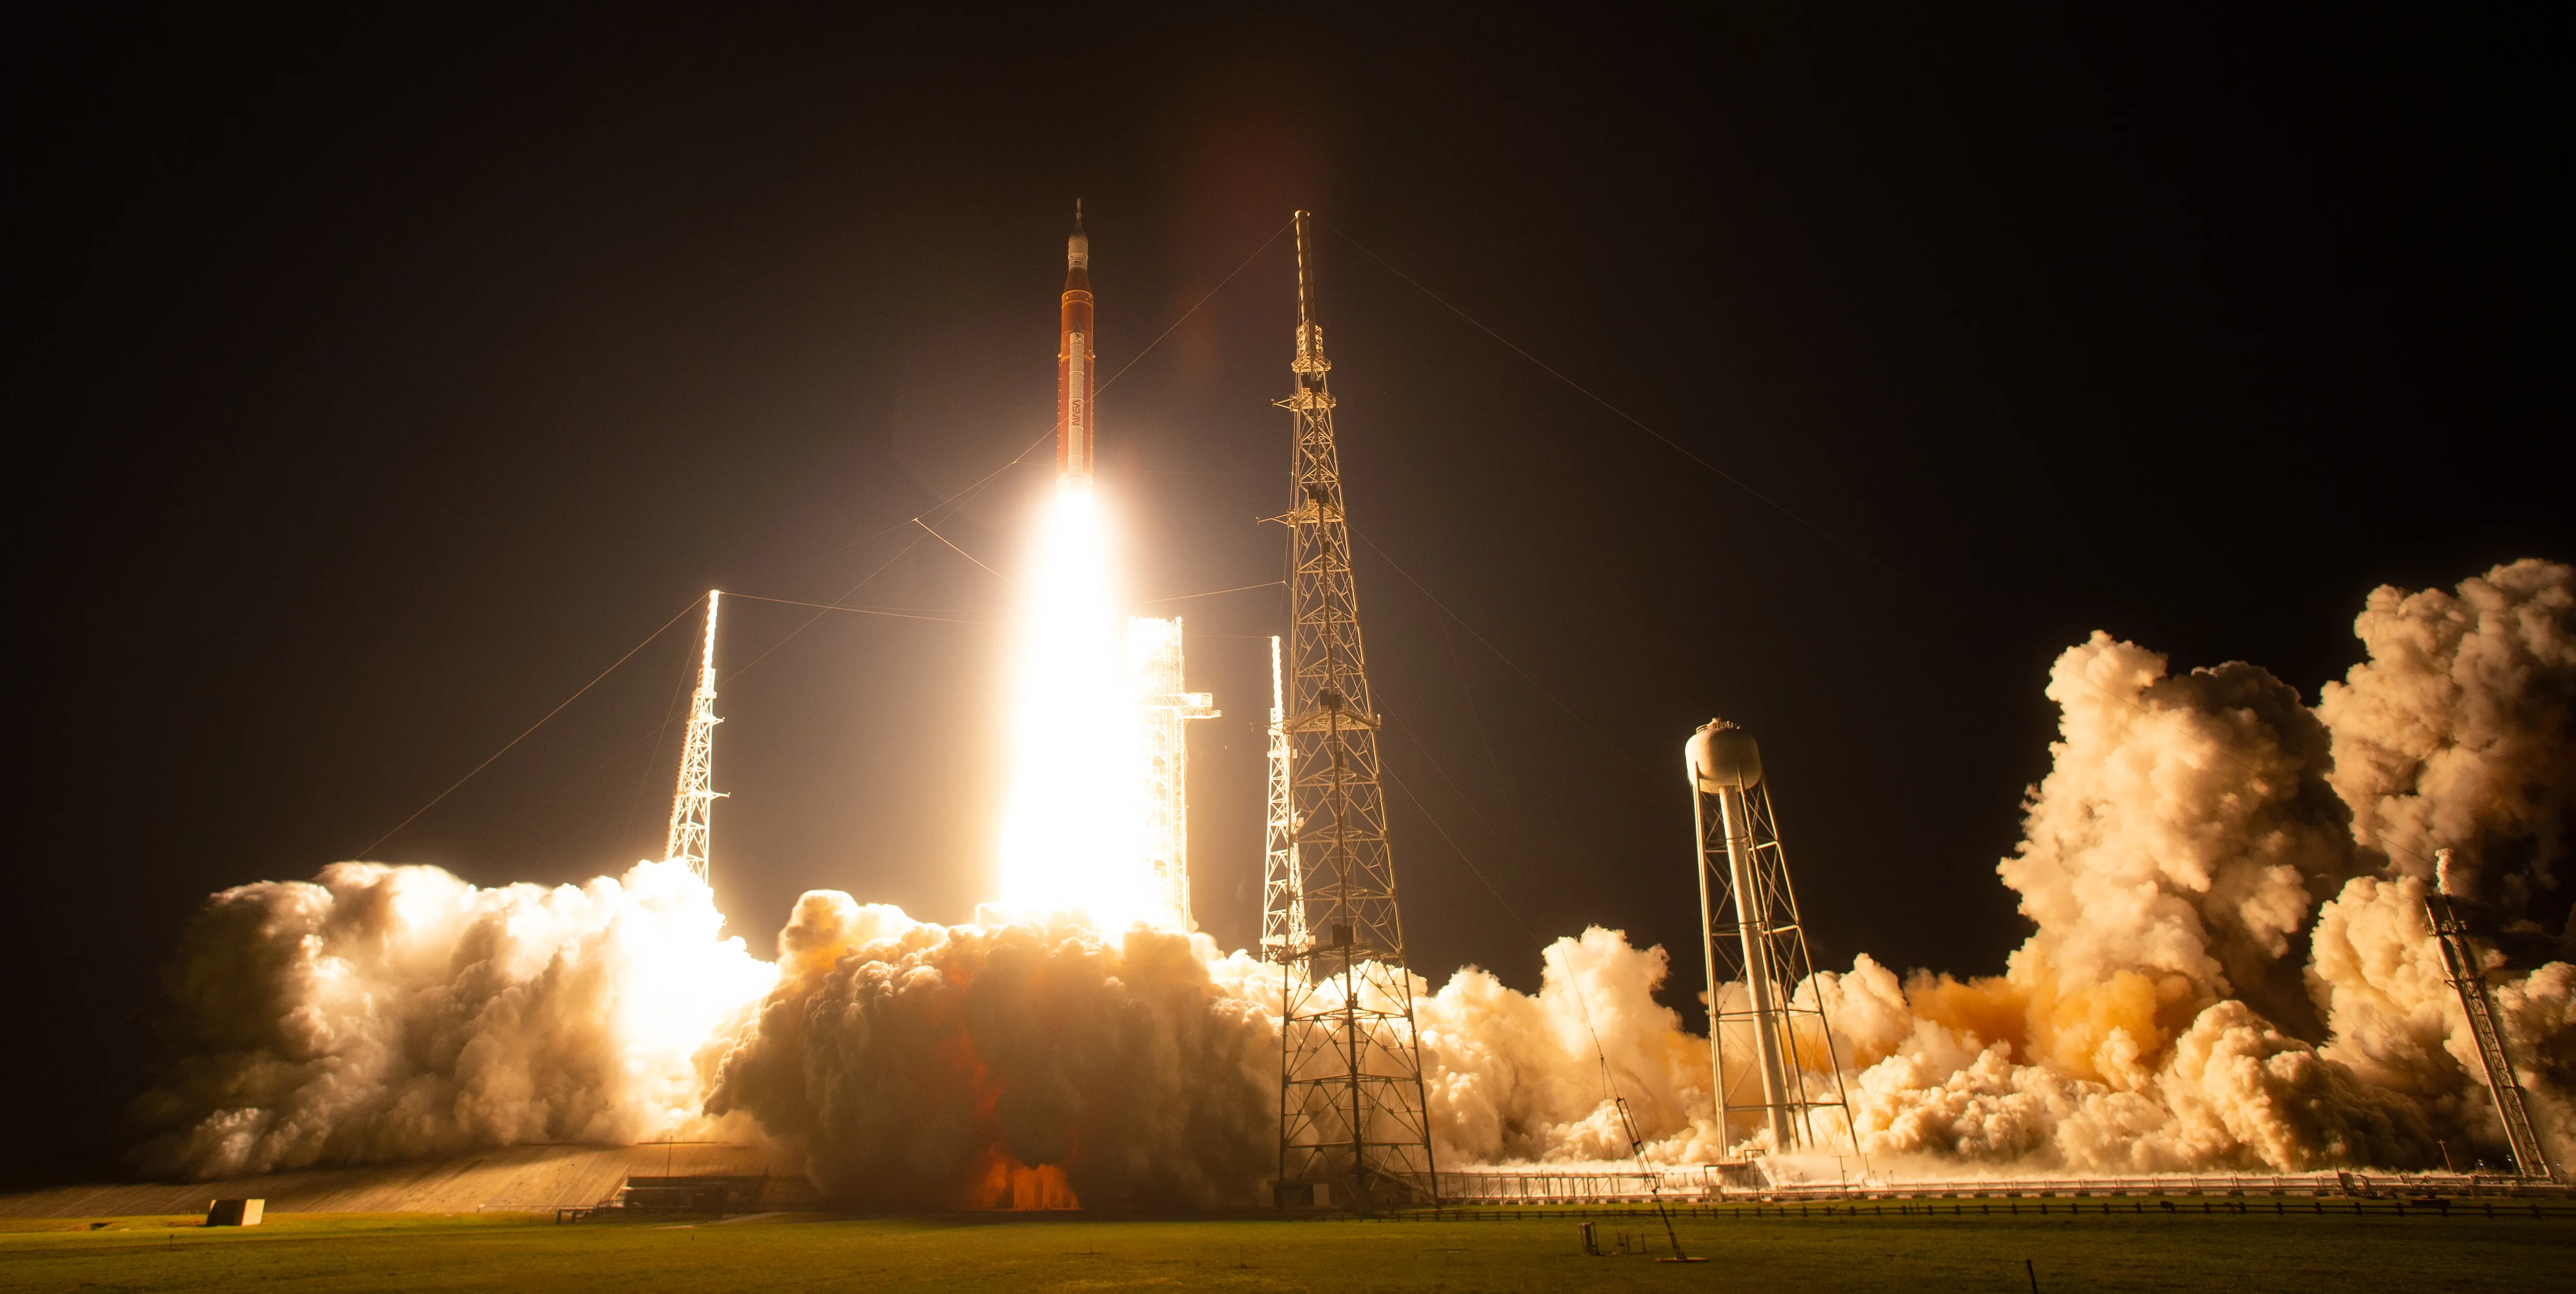
For A Night Launch
Night launches are different animals, and require some adjustment to your technique. Because it will be dark, Aperture Priority is out the window, and you’ll best be served by Manual mode.
The settings are counterintuitive. The shot below is unedited and has the following settings:
Quick Reference: Camera Settings Cheat Sheet (Night)
| Setting | Recommended Value | Notes |
|---|---|---|
| Mode | Manual | Full manual control is essential at night — metering systems cannot reliably handle the extreme brightness of a night launch. |
| Shutter Speed | 1/2000 sec | Slightly slower than day launches is acceptable; the plume is still bright enough to freeze at these speeds. |
| Aperture | f/8 | Maintains sharpness and depth of field across the rocket’s travel arc. |
| ISO | 2500 | Higher ISO needed for the dark sky; modern sensors handle this well in RAW. Adjust based on pad lighting conditions. |
| Exposure Value (EV) | 12 | Target starting point. The launch plume will blow out in order to capture the surrounding scene — this is expected. |
| Exposure Compensation | Bracket –1 and –2 | The plume brightens rapidly after liftoff. Bracketing protects against both underexposure on the dark sky and blowout on the plume. |
| White Balance | ~5600K (Daylight) | Renders the plume with a natural warm tone. RAW lets you fine-tune in post. |
| Focus Mode | Manual (pre-focused & taped) |
AF will hunt in the dark. Pre-focus on the launch tower before liftoff and tape the focus ring. |
| Drive Mode | High Speed Burst | Fire from T-0 through the first 15–20 sec to capture liftoff, tower clear, and roll maneuver. |
| Metering | N/A | Irrelevant in full Manual mode. Disable or ignore. |
| File Format | RAW + JPEG | RAW is critical at night for noise reduction and exposure recovery. JPEG for quick sharing. |
| Stabilization | ON if hand-held; OFF if on tripod |
VR/IS on a tripod can introduce blur at night when the system overcorrects on a stable platform. |
Pay special attention to this setting on launch night
Note: Night launch exposures change rapidly — the pad is dark, then the plume lights everything. These are starting points; shoot a test frame on the launch tower lights and adjust before T-0.
Consider the shot below of a Vulcan liftoff taken from about 2.4 miles away. Can you guess the settings?

See counterintuitive part now? The ISO seems insanely high. Thing is, it needed to be to support the high shutter speed and relatively closed aperture. The plume is blown out but you can see the rocket. Maybe dropping down to an Exposure Value of 13 or 14 would be more suitable for you. Artist’s choice.
Timing: Plan Your Shot in Advance
The single best thing you can do on launch day is decide in advance what you are going to photograph. Compose your frame before T-0. Do not be fiddling with your tripod head or reviewing your histogram when the countdown is at T-minus 30 seconds.
Camera Settings — At a Glance
| Setting | Value |
|---|---|
| Mode | Shutter Priority (Tv/S) or Manual |
| Shutter Speed | 1/2000 sec |
| Aperture | f/8 |
| ISO | 200–400 |
| Exposure Value (EV) | 16 |
| Exposure Compensation | –1 to –2 EV |
Note: These are recommended starting points. Adjust based on actual lighting conditions at your viewing location.
Whatever composition you choose, widen it out by about 10% from what you think you want. This gives you room to straighten, crop, or reframe the image in post-processing without losing critical elements at the edges.
Launch Day: Practical Notes
Arrive Early and Acclimate Your Gear
Arrive at your chosen location early — for Playalinda or Banana Creek, this means several hours before the launch window opens. Beyond just securing your spot, arriving early gives your camera equipment time to acclimate to the ambient temperature and humidity. A lens that has been sitting in an air-conditioned car in Florida spring heat will fog immediately when you take it outside, just like glasses fogging when you step outdoors. Give your equipment 20–30 minutes to equalize before you start worrying about your settings.
Stay on Top of the Timeline
Launch updates, weather advisories, and GO/NO-GO status will be streaming on NASA’s official YouTube channel and on SpaceFlight Now. Both will be live well before T-0. Be aware that streaming video runs 7–10 seconds behind real time — you will hear the commentator call liftoff slightly after the vehicle has already left the pad, visually. Use the stream for situational awareness, not as your shutter trigger cue. Watch the pad directly.
Weather: April in Florida
Artemis II is targeting an April launch window. April on the Space Coast is generally more favorable than summer for launch photography — lower humidity, fewer afternoon thunderstorms, and cleaner skies. That said, Florida weather is Florida weather. Morning storms are possible, and the Air Force Weather Squadron maintains strict lightning rules that can hold or scrub the launch. Check the weather forecast daily as the window approaches, and have a weather app that shows local lightning strikes active on your phone at the viewing site.
Even in April, bring sunscreen, water, and a hat. Standing on a beach or in open scrubland in the Florida sun for several hours will wear you down faster than you expect. Even in mid-afternoon when it is relatively cool, it is easy to get a sunburn you’ll be telling stories about years from now, especially if you are not used to being out in the sun all day.

Post-Processing: Bringing It All Together
Even with excellent in-camera settings, launch photos almost always need some post-processing work. The dynamic range of SLS — a brilliant plume against a sky with a dark steel vehicle body — will likely require adjustments that your camera cannot solve automatically.
In Lightroom, start by evaluating the RAW exposure globally. You may find that the image is intentionally dark in the shadows (which is correct — you were underexposing) with well-preserved highlight detail in the plume. Use the Highlights and Whites sliders to pull back the brightest areas, and the Shadows and Blacks sliders to lift the darker areas of the frame. The HSL sliders can help bring out the orange and gold tones in the SRB flame.
For more complex images where the exposure delta between the plume and the vehicle body is extreme, use Lightroom’s masking tools or move to Photoshop for dodging and burning. These are powerful techniques and worth learning — there are excellent tutorials on YouTube for both.
Apply noise reduction if you shot at higher ISO values. Modern AI-based noise reduction in Lightroom and Photoshop is remarkably effective and should be a standard step in your processing workflow for launch images.
Finally, save your processed images in JPEG at high quality for sharing. Your RAW originals should be archived and kept.
Nighttime is a bit of a different animal. You’ll be forced to compromise a bit: keep the bright plume under control, exposure-wise, or let it blow out the highlights a bit and get some detail on the rocket.
Most Importantly: Be Present
Artemis II will carry four astronauts — Reid Wiseman, Victor Glover, Christina Koch and Jeremy Hansen — on the first crewed lunar journey since Apollo 17 in December 1972. The last time human beings left Earth orbit, the Space Coast was a very different place. This launch is not just a rocket going up. It is a moment in history.
Take your photos. Take good ones. But also put the camera down for a few seconds and just watch. Listen to the crowd. Feel the sound wave arrive. Watch the SRBs separate far up in the sky. Let the moment land.
You have come a long way — literally or figuratively — to be here. The photographs will be extraordinary. But the memory of simply being present for this will outlast them all.
Good luck, and clear skies.
For launch times, viewing location maps and live updates, bookmark Talk of Titusville. We will have up-to-date Artemis II coverage from the launch campaign through liftoff.
Author: Charles Boyer
NASA kid from Cocoa Beach, FL, born of Project Apollo parents and family. I’m a writer and photographer sharing the story of spaceflight from the Eastern Range here in Florida.


Leave a Reply